Enterprise Server Options - System Monitor
The System Monitor is used to send a Halcyon specific request to any identified remote system Network Manager. If no response is received, an alert is raised. This is useful to ensure that all systems are constantly being monitored and highlights any connection or power issues that may be affecting a remote system.

There are two tabs of information to complete when specifying System Monitor criteria. These are accessed at the bottom of the main display panel.
System Monitor section
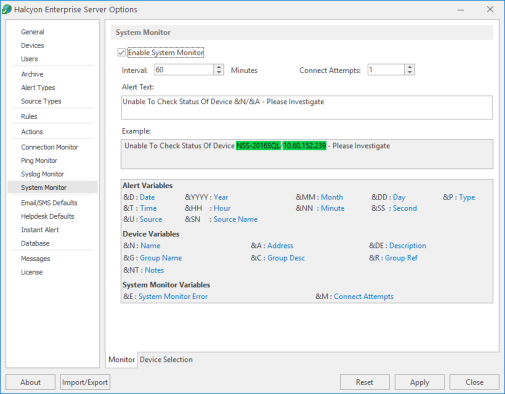
This section is used to activate the System Monitor and define the text of any alerts that it generates.
Enable System Monitor
Check this box to enable the System Monitor and associated settings.
Interval Minutes
This option sets the monitoring interval in minutes. Either over type the current entry or use the up/down arrows to adjust the setting. The default setting is 60 minutes.
Connect Attempts
This setting defines the number of connection attempts that are made on each check to deem if the remote Network Manager is answering. For slow machines it is recommended that the setting is increased to handle any lack of response in inter-connectivity. The default setting is 1 attempt.
Alert Text
This is the text message used to report a system monitoring issue. This text can be edited as required. Alert, device and specific system monitor variables can be added to clarify the details of the message.
Example
An example of how the actual alert will be displayed if generated, based upon the text and variables used, is shown in the Example field.
Variables
System Monitor variables comprise of:
- Alert Variables: (such as Date, Time, Source, Type and so on)
- Device Variables: (such as Name, IP Address, Group Name and so on)
- System Monitor Variables: (includes System Monitor Error and Connect Attempts)
These variables can be added to the error message as required to identify the name and/or address of devices whose connections are monitored.
The Device Selection tab is used to select the Devices to which the monitor connects and raises alerts if the success percentage figure is not attained.

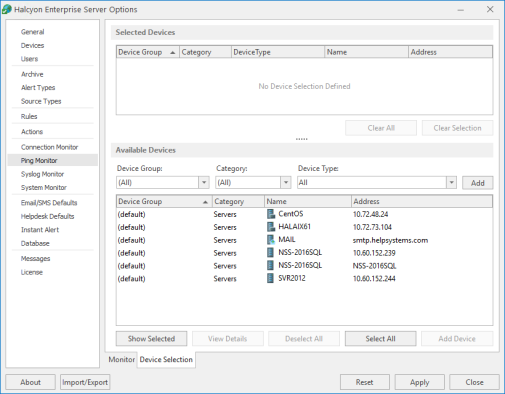
Selected Devices section
This section shows the devices that are currently selected for use with the monitor. When this tab is opened for the first time, this section is empty.
Information is listed in five columns:
- Device Group: Displays the name of the Device Group to which the device belongs.
- Category: Displays the category in which the device is defined.
- Device Type: Displays the Device Type of the device.
- Name: Displays the name of the device.
- Address: Displays the IP Address or Host name of the device.
Clear All
Click Clear All to remove all of the currently selected devices from selection.
Clear Selection
Highlight a device in the Selected Devices section and click Clear Selection to remove this device from selection. Multiple devices may be selected in one action.
Sorting columns
Column order can be rearranged by left-clicking on a column heading and keeping the mouse button depressed, dragging the column to the new position and releasing the button. Information in each column can be sorted in ascending or descending order by clicking on each column title to change the sequence.
Available Devices section
This section lists all of the devices that have been defined in Device Manager.
Filter options
These options allow the filtering of available devices on the network in order to restrict the list of available devices to just those that meet the filter criteria.
The categories comprise:
- Device Group: Device groups are collections of similar devices, such as all those that belong to a specific department. Device groups are set up and maintained in Device Manager
- Category: Devices, such as servers that can be divided into specific types. Items listed here are by default. No other items can be added to this list.
- Device Type: Device types, such as proxy servers are listed on this drop down and comprise a mix of default items and any other items identified on the network, which are automatically added to this list.
Add Device
To load a device into the Selected Devices section of this page, select the required device in the Available Devices section and click Add Device to move it into the Selected Devices section.
Show/Hide Selected
Click to show in the Available Devices section, only those devices not already listed in the Selected Devices table. This avoids duplicating device information in both tables. Click again to show all available devices, including those that have already been selected.
View Details
This button is used to open the View Device dialog, which displays the attributes of a selected device. No amendments can be made on this display. If changes are required, use Edit Device in Device Manager.
Deselect All
Click to deselect all of the currently selected devices in the Available Devices section.
Select All
Click to select all of the devices listed in the Available Devices section.
