Status - Robot SCHEDULE Dashboard Widget
For the selected system, this widget displays a snapshot of the current status of Robot SCHEDULE and its jobs.
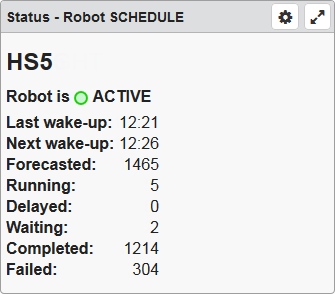
It shows the following information:
- The system name.
- The status of the Robot SCHEDULE monitor jobs (Robot). Possible statuses:
 ACTIVE - Indicates that the Robot SCHEDULE monitor jobs have been started; Robot SCHEDULE can submit scheduled jobs
 INACTIVE - Indicates that the monitor jobs have not been started; Robot SCHEDULE cannot submit scheduled jobs.
 UNKNOWN - Indicates that Robot SCHEDULE is starting or stopping, the monitor jobs were ended, or that Robot SCHEDULE was ended when the RBTSLEEPER subsystem was ended. If the monitor jobs or RBTSLEEPER were ended, the status remains UNKNOWN until Robot SCHEDULE is restarted.
- The last time Robot SCHEDULE woke up to submit a job and the next time it's scheduled to wake up and submit one. For more information, see Robot SCHEDULE Job Execution.
- The number of jobs for today in the following categories:
- Forecasted
- Running
- Delayed
- Waiting
- Completed
- Failed
The data in this widget is presented differently depending on the size of your browser and your screen. You may see a graph or simply a list.

Things you can do:
- ClickTap
 Maximize to view the widget full-screen. ClickTap
  to view it on the dashboard again.
 - If you see a graph, clicktap any item in the legend to hide or show its data in the graph.
To change the settings:
-
ClickTap
 Settings on the widget.
 -
Type a new Name, if necessary.
-
ClickTap Reset Name to have the software create a name based on the widget and the settings you've selected.
Note: If you're using the system-generated name, be sure to click Reset Name before saving so that a new name can be generated, if needed.
-
Select the display Size of the widget on the dashboard. This affects the height of the widget.
-
ClickTap the Auto-Refresh button to enable it (Yes) or disable it (No).
-
Type the number of minutes between each Auto-Refresh (Min).
-
Select the Systems to display.
If you choose Selected System, clicktap Look Up to select the one you want.
Note: For information on selecting the default system for Robot Schedule, see Select System.
-
ClickTap Save.
Note: ClickTap Delete to delete this widget from the dashboard.
See also:
Robot SCHEDULE widget descriptions