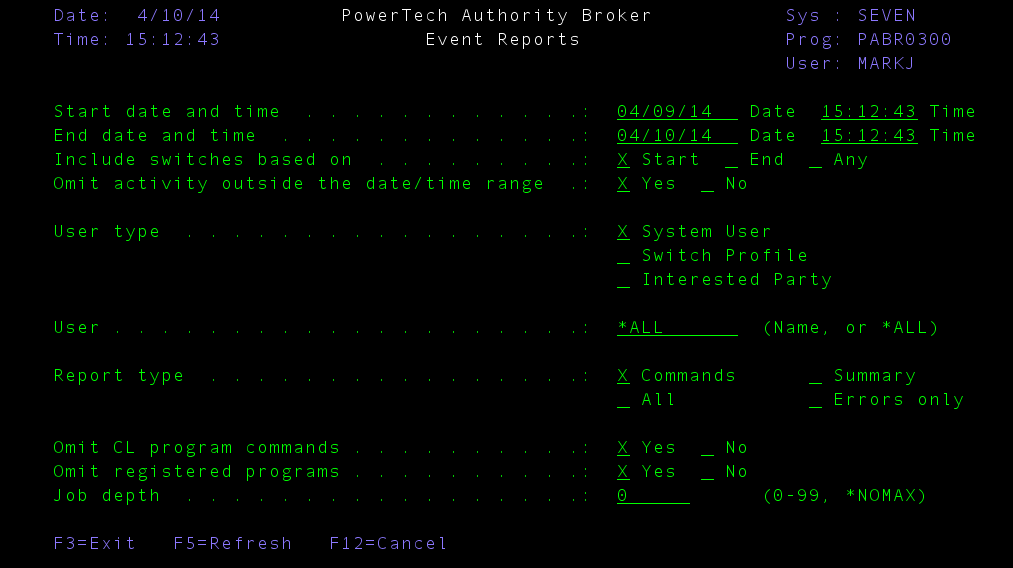
Event Reports screen
How to Get There
From the Authority Broker Main Menu, select option 2 (Run Authority Broker Event Reports).
Time periods can be specified for reports. The time period refers to the time when the switch is first initiated. Specify a time range using the From Time and To Time columns. From Time and To Time must be a valid time, which is any value between 00:00:00 and 23:59:59. To Time must be later than From Time.
What it Does
The Event Report Selection screen is used to request a report of Authority Broker events. The options available allow you to specify which events you want and the format of the report.
Authority Broker Event Reports provide information of interest to auditors.
Options
- Start Date/Time: The Start Date and Time fields specify the first [earliest] of the events to be included on the report. The Start Date and Time must specify a time before that of the To Date and Time.
- End Date/Time: The End Date and Time fields specify the last [latest] of the events to be included on the report. The End Date and Time must specify a time after that of the Start Date and Time.
- Include Switches Based On: Specifies how profile switches are selected to be on the report. Possible values are:
- Start: Selecting Start will include profile switches that started during the selected date and time range.
- End: Selecting End will include profile switches that ended during the selected date and time range.
- Any: Selecting Any will include profile switches that had any activity during the selected date and time range.
- Omit Activity Outside the Date/Time Range: This parameter specifies if detail activity that falls outside the selected date & time range should be omitted from the report. Possible values are:
- Yes. Detail activity that falls outside the requested date and time range will be omitted from the report.
- No. Detail activity that falls outside the requested date and time range will be included on the report.
- User Type: This parameter determines the key element for reporting switches that have occurred. You must select one [and only one] field by placing an 'X' in the corresponding field. This field works with the User field to define what information is included on the events report and how it is sorted. There are three possible fields:
- System User is the user profile who performed the switch.
- Switch Profile is the profile into which a system user switched.
- Interested Party users who have been registered that they wish to receive reports when specific profile switches occur.
- User(s): Enter the user profile you want to list events for. This field works with the User type field. For example, if you specify a user name in this field, and System User in the User type field, the resulting output will list all of the switches where the specified user was the System User on a switch. If you enter *ALL then all users will be selected. Possible values are:
- User-profile: The specific user profile to report.
- *ALL: All users are reported
- Report Type: Enter an X before the type of information you want on the report. Possible values are:
- Commands: Selecting Commands will limit the audit activity shown on the report to the switch profile events and the commands run while the switch was effective. The command information is based on 'CD' type entries in the IBM security audit journal (QAUDJRN).
- Summary: Selecting Summary will limit the information on the report to just showing when a user switched to another profile and when a profile switch was released. This selection provides the least amount of detail on the report.
- All: Selecting All will show all of the switch and release activity, as well as all of the audited activity while the user[s] was(were) switched. This selection provides the most detail.
- Errors: Selecting Errors Only will limit the information on the report to just showing attempted switches that failed for some reason. Some reasons that a switch may fail are a user was not defined to be allowed to swap to the user they attempted to swap to, or a user tried to swap to another profile during a restricted time, etc.
- Omit CL Program Commands: Enter an X before the Yes if you only want to see audit activity of commands that were not run from a CL program. Selecting Yes will eliminate commands that are run within CL programs. Enter an X before the No if you want to see all audit activity for commands.
- Omit Registered Programs: Enter an X before the Yes if you want to omit from the reports the programs and commands registered as ones to omit from reporting. Enter an X before the No if you do not want to omit them. To register programs and commands, use the "Work with Programs to be excluded from reports" option from the Configuration Menu.
- Job Depth: Enter the depth of jobs you wish to include with the report. A profile switch can start an unlimited number of additional jobs. Job depth provides the ability to report to a specific depth. For example, job A can submit job B, job B can submit job C, job C can submit job D, and so on. Jobs B, C, and D can be eliminated from the report by selecting a depth of 0. Selecting a depth of 2 will include activity for jobs A, B, and C. Selecting a depth of 3 will include jobs A, B, C, and D. Possible values are:
- 0-99: The depth of jobs to report. Value must be between 0 and 99. A value of 0 means no additionally started jobs are to be reported.
- *NOMAX: All activity that occurred due to a profile switch is reported.
Once you have set up the report with your desired parameters, press Enter to get to the second screen (Event Reports Output Options screen ).