
Creating a User
This topic shows you how to create a user. Each user needs an account to log in to WebDocs. Later, you can add the user to a group and choose how users in groups can work with documents.
To create a user:
-
From the main menu, choose 10: Work with Users and Groups.
Work with Users and Groups displays. -
Press F6.
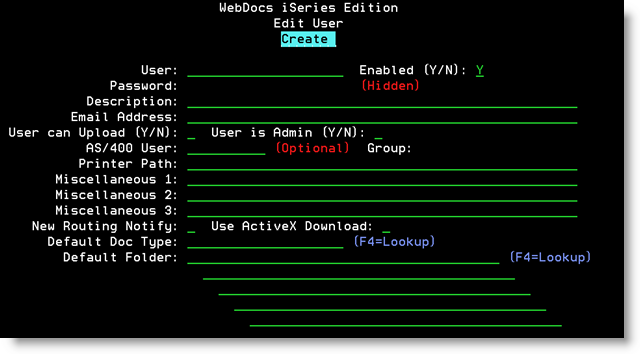
Edit User - Create displays.
-
Set up the user based on the following descriptions:
Field Description User A log-in name for the user.
The user name is case-sensitive.
Enabled
- Y - Allow the user to log in to WebDocs.
- N or blank - Do not allow the user to log in to WebDocs.
Type a WebDocs password for the user or type one of the following:
Note: This password is case-sensitive.- *AS400 - Use the user's existing iSeries password. The user name must match the iSeries user name and be all upper case.
Note: If the user's iSeries password expires, so does their access to WebDocs. - *LDAP - Validate the user ID and password against an LDAP directory. To use this option, the WebDocs user name must match the LDAP user name, which is usually case sensitive, and you must also set up LDAP in WebDocs. For more information, seeAuthenticating a User with LDAP.
Description
A description of the user, usually the user's first and last name.
The user's email address:
- The From email address when the user emails documents from the web client.
- If you also set New Routing Notify to Y, where this user's routing notifications are sent.
If you leave this field blank, this address defaults to the From address in the FROMADDR data area.
- N or blank - Do not allow the user to add a new document to WebDocs or display the upload option on the website.
- Y - Allow the user to add new documents to WebDocs. Always choose this option if you give the user the check-in permission.
Whether the user has the authority to do the following administrative tasks:
- Upload new documents.
- View the audit log for documents from the web client.
- Undo document check-outs.
- View SQL debugging information if the DEBUGSQL data area is set to *YES.
Choose:
- N or blank - Do not make the user an administrator.
- Y - Make the user an administrator.
AS/400 User ID
Most set-ups do not require this setting. Do not use this field unless RJS Software technical support has recommended it.
Note: To use the iSeries user ID and password, do not use this parameter. Instead, type the user's iSeries ID in User and *AS400 in Password.
Group (Display only)
Do not use this field. It displays only as a reference for older versions of WebDocs.
If you have set up multiple-document printing, choose how the documents this user selects are printed when they click Print
 from a folder-list page. For more information, see Setting Up Printing.
- *PDFMULT - Open all selected PDFs in a single PDF that the user can then print from their PC.
Note:This option only prints PDFs. - *PRINT:LIBRARY/OUTQ - Put all selected documents in an output queue with an attached printer.
For example: *PRINT:QGPL/TIFFPRT
Miscellaneous 1-3
Most set-ups do not require these settings. Do not use these fields unless RJS Software technical support has recommended it.
- N or blank - Do not email the user when a document enters their routing inbox.
- Y - Send emails to the user's Email Address with links to documents in their routing inbox. To activate this notification, you then need to:
Use ActiveX Download
Most set-ups do not require this setting. Do not use this field unless RJS Software technical support has recommended it.
A default Document Type that is automatically selected when this user checks in or searches for documents:
Note: You can also set the default Document Type for the user's primary group.
Best Practice: If this user will usually choose the same Document Type, setting this field saves them time when checking in documents and also automatically gives them access to that Document Type.
- Place the cursor in this field and press F4.
Document Type Lookup displays. The Document Types the user has access to have an X in the Opt column. - Type 1 next to the default Document Type for this user.
- Press Enter.
The Document Type you chose displays in Default Doc Type.
A default folder that is automatically selected when this user checks in a document:
Note: You can also set the default folder for the user's primary group.
Best Practice: If this user will usually choose the same folder, setting this field saves them time when checking in documents and also automatically gives them access to that folder.
- Place the cursor in this field and press F4.
Folder Lookupdisplays. The folders the user has access to have a Y in the Opt column. - Type 1 next to the default folder for this user.
- Press Enter.
The name of the default folder you chose displays in Default Folder.
-
Press Enter to accept the new user.
Custom User Filter Criteria displays.
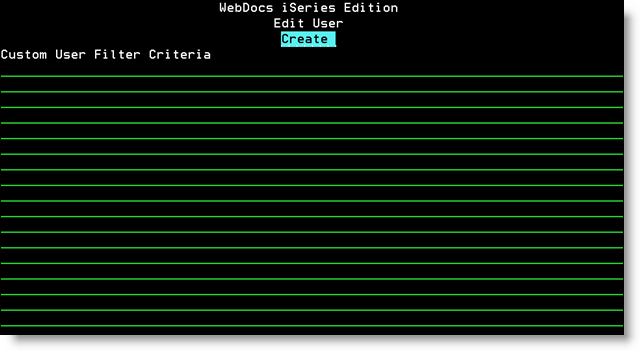
-
(Optional) Enter additional criteria to further limit the documents this user can access. For more information, see Adding Custom User Filter Criteria.
-
Press Enter to add the user.
The message Record Added displays.The cursor returns to the user field so that you can add additional users. -
Press Enter to return to Work with Users and Groups.
To allow this user to access folders and Document Types besides the defaults, see Creating a Group and Assigning Permissions.
To add this user to a group, see Adding a User to a Group.