Add and Create Columns
As with tables, you need at least one column (or all columns) in a query to display meaningful information. The assumption here is that your query has at least one table selected. In the query builder you can add, rename, create new, group by, remove, and sort columns.
The processes below are the same for new queries, and for modifying existing queries (once opened in the editor). To modify, re-sequence, or remove columns, see the topic, Modify Columns.
Select Existing Columns
By default, every time a file is added to a query all columns are selected and added to the query.
Steps
-
Once in the Query Editor (see Create a New Query for information) press the table icon
 for the table containing the columns you wish to work with.
 The Edit Table panel opens on the right showing all the columns in the table.
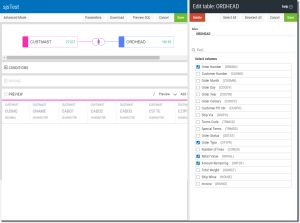
- Check or uncheck individual column names, or press the Select All or Deselect All buttons to add and/or remove columns.
- Press Save
 when finished.

Apply a Function to a Column
Steps
-
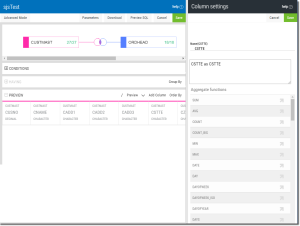
For the column you wish to alter, simply click on the header of the column in the results section.
The Column Setting panel opens on the right.
-
Select a function from the drop-down list. If you hover over the function you will see a brief description and syntax.
[pic]
-
Once selected you will have to edit to make sure the starting field is placed inside the function correctly.
[pic}
- Press Save when finished.

Add (create) a New Column
New columns can be created by applying function to existing columns, or modifying columns using numeric or character functions.
Steps
-
Press the Add Column
 button.
 The Column Setting panel opens on the right.
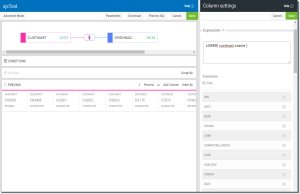
- Enter a Name for the new column.
- Select a function from the drop-down, and replace the 'expression' with a column name.
- Press Save when finished.
