Editing an Existing Product Connection
Follow these steps to edit the definition for a connection:
-
In the Navigation Pane, clicktap Settings.
-
ClickTap Products.
-
ClickTap the name of the system you need to edit. The page that opens shows the current definition and a list of the HelpSystems products installed on that system along with their versions.
-
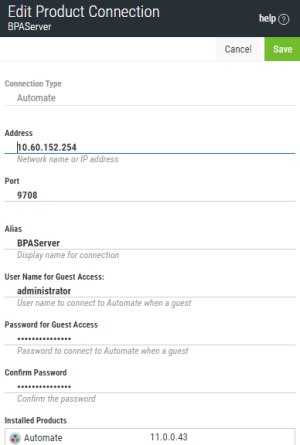
 If you chose an Automate Enterprise Server connection:
-
Enter the IP Address (or network name) of a different Automate Enterprise server, if necessary.
-
Enter a different Port number for the server.
-
Enter a different Alias for the server. This is what displays throughout Insite.
-
Enter a User Name for Guest Access and Password for Guest Access (and Confirm Password) for a user who would log on as a guest on the system you entered above
NOTE: You will not necessarily log on to Insite as this user (unless you choose to). This is just the user that allows the connection to be made to the Automate Enterprise server.
-
-
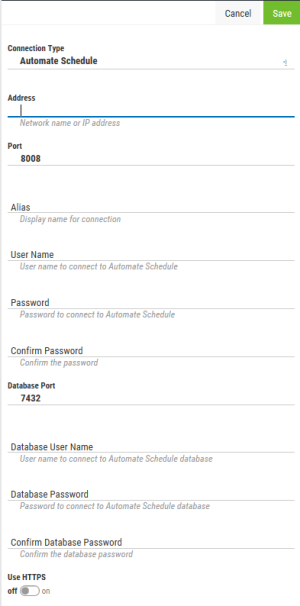
 If you chose an Automate Schedule server connection:
-
Enter the IP Address (or network name) of a different Automate Schedule server you want to connect to.
-
Enter a different Port number for the server.
-
Enter a different Alias for the server. This is what displays throughout Insite.
-
Enter a different User Name and Password (and Confirm Password) for the user of the system you entered above.
-
Enter a different Database Port number.
-
Enter a different User Name and Password (and Confirm Password) for the database user of the database you entered above.
-
Toggle Use HTTPS to 'on' to use a secure connection, or leave 'off' to use HTTP.
-
-
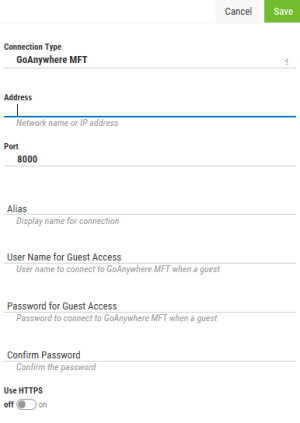
 If you chose a GoAnywhere MFT system connection:
-
Enter the IP Address (or network name) of a different GoAnywhere MFT system you want to connect to.
-
Enter a different Port number for the system.
-
Enter a different Alias for the system. This is what displays throughout Insite.
-
Enter a different User Name for Guest Access and Password for Guest Access (and Confirm Password) for a user who would log on as a guest on the system you entered above.
-
Toggle Use HTTPS to 'on' to use a secure connection, or leave 'off' to use HTTP.
-
-
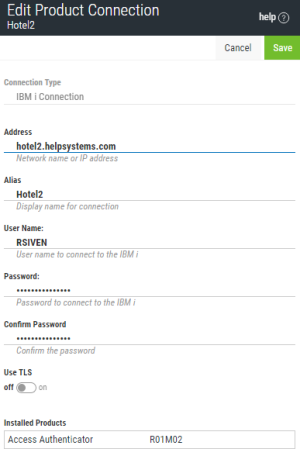
 If you chose an IBM i connection:
-
Enter the IP Address (or network name) of a different IBM i system, if necessary.
-
Enter a different Alias for the IBM i system. This is what displays throughout Insite.
-
Enter the User Name and Password (and Confirm Password) for a user on the system you entered above.
NOTE: See the IBM i connection considerations section below. -
Toggle Use TLS to 'on' to use TLS security to encrypt the connection.
 IBM i connection considerations:
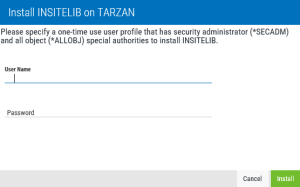
- New library 'INSITELIB' will be added to all iSeries that Insite is connected to. Upon initial iSeries connection creation, you will be required to provide a login with security administrator (*SECADM) permissions and all object (*ALLOBJ) special authorities, but this login will not be saved. It will only serve to allow Insite to install the INSITELIB library.
- Two new users will be added as well:
- INSITEUSR and INSITEADM - These users function similarly to how RBTADMIN, PTADMIN and RBTUSER, PTUSER behave upon installation of Robot and Powertech products. They are designed to own all connected product objects so that you are not required to create a profile in Insite with *SECOFR permissions to interact with your iSeries.
NOTE: For Powertech Network Security users, in order to have *USER on the profile connection and use Powertech products, the profile with the connection MUST be added to the PTADMIN authorization list. More information.NOTE: IBM i systems that will be connecting to your Insite Server must be at V7R2 or higher. -
-
 If you chose a Insite Analytics connection:
-
Enter the IP Address (or network name) of a different Insite Analytics system, if necessary.
-
Enter a different Port number for the system.
-
Enter a different Alias for the system. This is what displays throughout Insite.
-
-
 If you chose an Intermapper system connection:
-
Enter the IP Address (or network name) of a different Intermapper system you want to connect to.
-
Enter a different Port number for the system.
-
Enter a different Alias for the system. This is what displays throughout Insite.
-
Enter a different User Name and Password (and Confirm Password) for a user who would log on the system you entered above.
-
Toggle Use HTTPS to 'on' to use a secure connection, or leave 'off' to use HTTP.
-
-
 If you chose a Vityl IT & Business Monitoring connection:
-
Enter the IP Address (or network name) of a different Vityl IT & Business Monitoring system, if necessary.
-
Enter a different Port number for the system.
-
Enter a different Alias for the system. This is what displays throughout Insite.
-
-
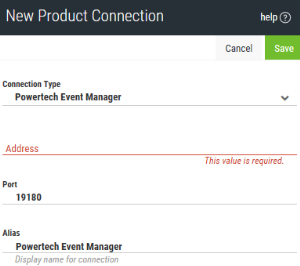
ClickTap Save.
