Authentication
The Authentication page is only accessible to a user with administrative permissions. It allows you to set the session timeout, define the authentication method, and enable guest logins.
Getting There: In the Navigation Pane, clicktap Authentication under Settings. If the menu is hidden, clicktap  .
.
You can do the following:
You can set the number of minutes a session can remain inactive before timing out.
Before any of your users can log on to Insite, you must specify how to authenticate users. You can choose to authenticate your users against an LDAP server, one of your IBM i systems, one of your Automate Enterprise servers, or one of your Webdocs for IBM i systems.
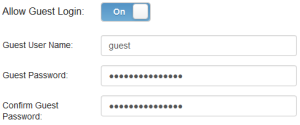
A guest profile allows you to give people access to the dashboards that are marked as Guest. The Guest profile is for people who normally don't log onto the product and who may not even have an IBM i, Automate Enterprise server, or Webdocs IBM i profile. Guest users can only access the Dashboard area and view only those dashboards designated as Guest. They cannot access any other part of Insite, see any other dashboards, or make any changes.
The default Guest profile credentials are: User Name = guest, Password = guest. However, you can change it, if necessary. All guests use the same guest profile.
To complete the above tasks:
-
In the Navigation Pane, clicktap Authentication under Settings. If the menu is hidden, clicktap
 .
. -
Enter the Session Timeout in minutes.
NOTE: If the timeout limit set here is greater than what a user sets for the auto-refresh intervals for dashboard widgets or in their preferences (for items such Automate Activity, Schedule Activity, or the Status Center), it will prevent the user's session from timing out if they're on one of those pages. -
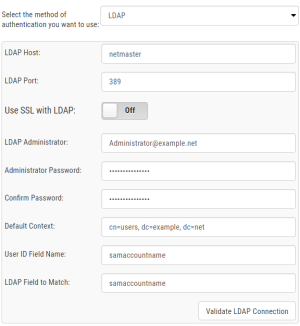
ClickTap in the authentication method field and select LDAP, IBM i, Automate, or Webdocs for i.
 If you chose LDAP:
-
Enter the name or address of the LDAP Host server.
NOTE: These settings are specific to the HelpSystems Insite module, and do not pertain to Access Authenticator's LDAP settings configured on Access Authenticator's LDAP Settings page. -
Enter the LDAP Port used by the LDAP server.
-
Switch Use SSL with LDAP to On if a secure sockets layer (SSL) is used with your LDAP server.
-
Enter the name of your LDAP Administrator. This administrator must be able to read the LDAP tree.
NOTE: Distinguished Name format is acceptable. For more on Distinguished Names, go to the Microsoft Developer Network website. -
Enter the Administrator Password (and Confirm Password) for the administrator you entered above.
-
Enter the Default Context for the LDAP server. This is the location to search for users in Distinguished Name format.
-
Enter the User ID Field Name for the LDAP server. This is the Attribute Name to search in for the username.
-
Enter the LDAP Field to Match. This is the value that matches the "samaccountname" listed for the user on the LDAP server.
-
ClickTap Validate LDAP Connection to test the information you entered above.
 If you chose IBM i:
-
Enter the name or Address of the IBM i server you want to use for authentication.
NOTE: This doesn't have to be one of the IBM i systems that you're connecting Insite to (see Product Connections). -
Enter an Alias for the server you specified above.
NOTE: The alias you enter here is displayed on the Log In page as the server that's providing authentication. -
Enter the Port the server uses.
-
-
To enable guest logins and define the guest profile:
-
ClickTap Save.


