Creating Search Keys
You must create a Document Type before you can create search keys for it. Search keys display when users check in and search for documents.
To create search keys:
-
From the main menu, choose 14: Work with Document Keys.
Work with Document Keys displays. -
Press F6 to create a new search key.
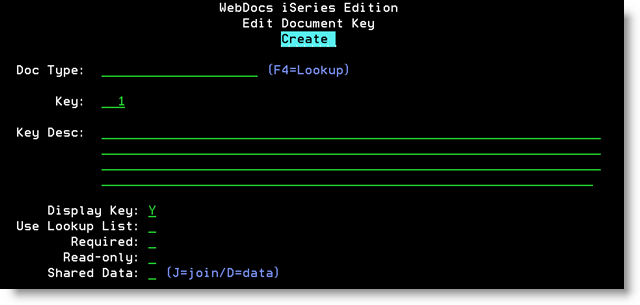
Edit Document Key - Create displays.
-
Set up the search key based on the following descriptions:
Field Description Doc Type
The Document Type for this search key. Press F4 to retrieve a list of Document Types.
Key
The number, from 1 - 10, for this search key among the 10 possible search keys for this Document Type.
For example: If you are creating search-key 5, type 5.
Note:You can create search keys in any order. So you can create search-key 5 without having created 1, 2, 3, or 4.
Key Desc
A description of the search key. This description displays for users in the web client.
Note:The descriptions for the 10 keys become the column headings in the web client. Default column headings display if there is no Document Type or more than one Document Type.
Whether to display the values from this search key in the search results.
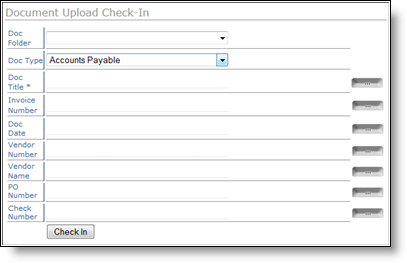
For example: If a search key description is Invoice Number and you choose to display values, the invoice number displays for each document in the search results. If you choose not to display values, the documents are listed, but the invoice numbers do not display.
- N - Do not display values.
- Y - Display values.
Note: To choose which search keys display in folder lists, see Displaying Search Keys.
Whether to display a drop-down list for the search key for users to choose from. Doing this can both reduce data-entry time and ensure consistency.
- N - Do not display a drop-down list. Users must type a value manually.
- Y - Display a drop-down list. Users must choose from the list you create.
- Blank - Users can type a value manually, and if you have set up custom look-ups, they can also choose from a list.
Required
Whether the user must enter a value for this search key.
- N - Not required.
- Y - Required.
Note: An asterisk (*) displays next to required fields when a user checks in or searches for a document.
Read-only
Whether a user can change the value of the search key or if it is for display only.
- N - The user can change the value.
- Y - The search key is read-only. The user can see the search-key value but not change it.
Shared Data
Ignore this field. WebDocs does not currently use it.
-
Press Enter to accept the new search key.
The message Record Added displays. The cursor returns to the Doc Type field so that you can enter additional search keys. -
Repeat steps 3-4 to add the rest of the search keys for this Document Type.
-
When you have added all the search keys for the Document Type, press Enteragain.
Work with Document Keys displays all the search keys for the Document Type, and when a user checks in or searches for a document of this Document Type, the search keys you chose display.