Creating Custom Look-Ups
WebDocs lets you create custom look-ups for users to choose values for the title or search keys. When you create custom look-ups, the button next to the title or search key is enabled and displays as blue instead of grey:  . Users then click button to display a pop-up window of all the valid values.
The pop-up window can contain up to two columns of data. Custom look-ups are most frequently used to find a code using a description. Typically the first column is a code, such as customer number, and the second column is a description, such as a customer name. Users can also search within the pop-up window.
The DOCLS00 file holds the custom look-up records. These records specify what data to retrieve, where to retrieve it from, and how to present it in the pop-up window.
Note: If you want to give users the option to either choose from a previously entered value or type a new value, leave Use Lookup List blank for the title or search key and then create a custom look-up with the values.
Depending on how you set up the custom look-up, when users click Browse either:
Creating SQL Custom Look-Ups
Creating a SQL custom look-up works the same for titles and search keys:
- For:
- InOptnext to the title or search key for the custom look-up,type 8 and pressEnter.
Edit Custom Lookup - Create displays.
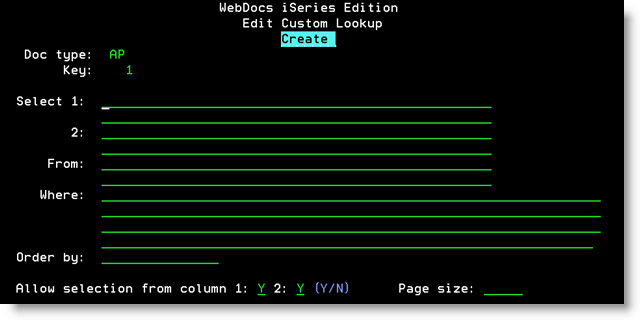
- Set up the custom look-up based on the following descriptions:
Field Description Select 1 An SQL expression for the first column in the custom look-up window.
- To display a column from a table, enter the column name. If columns are numeric, they will automatically be converted to character.
For example: To display the table column for search-key 5 in WebDocs, typeKEYWORD5. - To display the value in a search key, use the following format, where01is the number of the search key from which you want to pull a value:
= '@@01'
- To build a string from multiple values, type an expression like this:
'Timesheet for ' || strip(firstnme) || ' ' || strip(midinit) || ' ' || strip(lastname)
Select 2 An SQL expression for the second column in the custom look-up window. Use the same syntax as in Select 1. To only include one column in the custom look-up, leave this field blank.
From One or more tables that contain the data to display.
For example: To display the WebDocs document information file, typeDOCS00.
Where An SQL WHERE clause that chooses which data to include in the custom look-up.
For example:
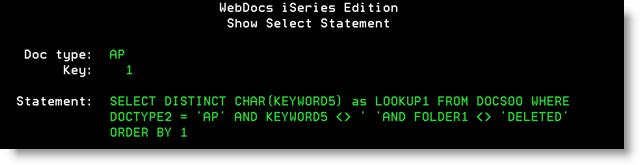
- To list all KEYWORD5's that have Document TypeAP, are not blank, and are not in the Deleted Folder:
DOCTYPE2 = 'AP' AND KEYWORD5 <> ' ' AND FOLDER1 <> 'DELETED' - To restrict a customer number to between 300000 and 399999, enter:
CUSNUM >= 300000 AND CUSNUM <= 399999 - To display the value in a search key,use the following format, where01is the number of the search key from which you want to pull a value:
= '@@01'
Order by How to sort the data. Type the column numbers and the order to sort them in:
- Type 1 to sort on the first column.
- Type 2 to sort on the second column.
- Type 1,2 to sort on the first column and then the second column.
- Type 2,1 to sort on the second column and then the first column.
- The default sort order is ascending. Type DESC to display the column in descending order.
Allow Selection from column 1andcolumn 2 - Y- Allow users to click the column entry to select it.
- N- Make the column entry read-only.
Page Size The number of lines to display per page in the custom look-up. - To display a column from a table, enter the column name. If columns are numeric, they will automatically be converted to character.
-
Press F21 to display the SELECTstatement built on the values you chose:
-
Press F14 to check the statement syntax.
- If you chose to display a search-key value anywhere in the SQL statement, a pop-up window displays for you to enter the substitution value. Type a sample value and pressEnter.
- If the messageStatement is validdisplays, there are no syntax errors in the SQL statement.
- If there are syntax errors, a specific error message displays. Click on the error and press F1 for more information.
- When you have resolved all syntax errors, press F16 to run the query.
- Review the query results to determine whether the query is accurate and useful for users. Modify the query and run it again until you are satisfied with the results.
Creating Exit Program Custom Look-Ups
You might want to call an exit program instead of building an SQL statement if:
- The logic you want to use is too complicated for an SQL statement.
- You need to group phrases in the SQL statement.
- You need more space than the screen provides.
- An exit program already exists and is ready to be called.
The example source code for a custom look-up program is in member DOCLOOKR of source file RJSIMAGE/SOURCE. Use this as a guideline if you plan to write and call your own exit program.
The exit program must already exist in an iSeries library before you create a custom look-up.
To call an exit program:
- For:
- InOptnext to the title or search key for the custom look-up,type 8 and pressEnter.
Edit Custom Lookup - Create displays.
- Press F15.
The program fields display.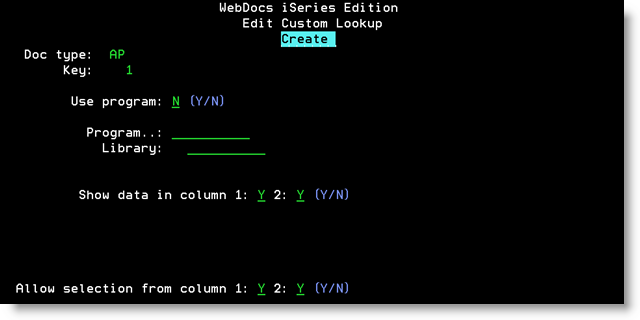
- Set up the custom look-up based on the following descriptions:
Field Description Use program - Y - Use this program.
- N- Set this program up for future use but do not use it now.
Program The name of the program to call. Library The library where the program is stored. Show data in column 1andcolumn 2 - Y- Display data in the first or second column.
- N- Do not display data.
Allow Selection from column 1andcolumn 2 - Y- Allow users to click the column entry to select it.
- N- Make the column entry read-only.
- Test your called exit program to make sure it returns the results you expect. RJS Software is not responsible if your exit program does not work correctly.