Creating a Document Type
To create a Document Type:
- From the main menu, choose 13: Work with Document Types.
Work with Document Types displays. - Press F6 to create a new Document Type.
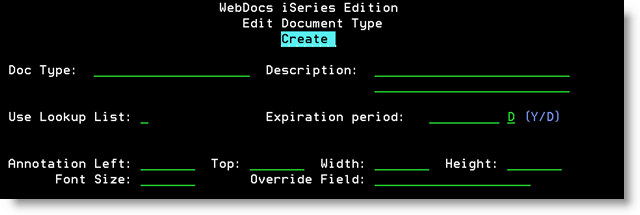
Edit Document Type - Create displays.
-
Set up the Document Type based on the following descriptions:
Field Description Doc Type A name for the Document Type that corresponds to the kind of document. Document Types can be up to 20 characters long and can only include the characters: A-Z, 0-9, hyphens (-), or pound signs (#).
Note: This is not the name that displays for users in the web client or in drop-down lists. The Description displays for users.
Best Practice: Create Document Types that will be easy to work with and that will be familiar to other system administrators.
Description A description for the Document Type. This description displays for users in the web interface or in drop-down lists.
Best Practices:
- Keep Document Type descriptions short to make them easier to work with. If you have long descriptions, users may have to adjust the width of the panels in their browsers to see the entire description.
- Create descriptions that users will recognize.
Use Lookup List Whether to display a drop-down list for the title for users to choose from. Doing this can both reduce data-entry time and ensure consistency.
- N - Do not display a drop-down list for the title. Users must type the title manually.
- Y - Display a drop-down list for the title. Users can type a title manually or choose a title from the list you create.
- Blank - Users can type a value manually. If you have set up custom look-ups, they can also choose from a list.
Expiration period How long documents of this Document Type are retained.
Note: Changing this value does not affect documents already in the system.
- To never let documents expire, leave this parameter blank.
- To set documents to expire in less than a year, type the number of days from 1 to 366 and, in Y/D, enter D (days).
- To set documents to expire in a year or more, type the number of years and, in Y/D, enter Y (years).
To purge expired documents, see Managing Documents.
Annotation Fields Most set-ups do not require these settings. Contact RJS Software before using them.
If there are no values in the annotation parameters in the DOCIMGPRT or DOCIMGEXP command, you can set parameters here for a note to display on the front page of the document.
- Left - The column number of the left edge of the annotation.
- Top - The line number for the top edge of the annotation.
- Width - The width of the annotation in characters.
- Height - The maximum height of the annotation in lines.
- Font Size - The size of the font of the annotation.
- Override Field - Ignore this parameter. WebDocs does not currently use it.
- Press Enter to accept the new Document Type.
The message Record Added displays. The cursor returns to the Doc Type field so that you can enter additional Document Types. - Press Enter to return to Work with Document Types.
The Document Type is created. -
Make sure the Document Type security data areas are set to meet your needs:
- If you want all users to have access to all Document Types, set DOCTYPESEC to *NONE and DOCTYPELMT to *NO. This is the default.
- If you want to restrict which users can access documents by Document Type, set DOCTYPESEC to *USER and DOCTYPELMT to *YES and then see Assigning Permissions.
To assign default values for the title drop-down list for this Document Type, see Creating Look-Up Lists.