Dashboard screen

How to Get There
Click  (Dashboards) in the Navigation Pane to open the Dashboards screen, which displays the list of available Dashboards. Click a Dashboard. Or, click Add A Dashboard to create a new one, define the Dashboard, and click Save.
What it Does
The Dashboard is a feature of the HelpSystemsInsite web browser interface. Insite can be downloaded from your User Account page on the HelpSystems website.
The HelpSystems Insite Dashboard can be used to display a visual representation of product activity.
You can create as many Dashboards as you like. A Dashboard can include any combination of Widgets. See New/Edit Widget pane for details. You can mix widgets from different products and Data Sources (servers). Dashboards are specific to the profile you used to log on. However, you can share them with everyone or keep them private, as needed. Users logging on with the guest profile can view only those dashboards marked as Guest. For more on the guest profile, see Authentication.
Options

Click this button to open the Filter pane, which allows you to configure filter settings. See Filter pane.

Refreshes data for all Widgets from the Data Source.
Edit Mode; On • Off
Toggle this switch to On to activate the Dashboard editing functions. The title bar of the dashboard turns yellow.

- Edit. Click Edit to open the Edit Dashboard pane, where you can edit dashboard settings.
- Click Undo to undo the most recent Dashboard action.
- Click Redo to redo the most recently undone Dashboard action.
Widget Frame options
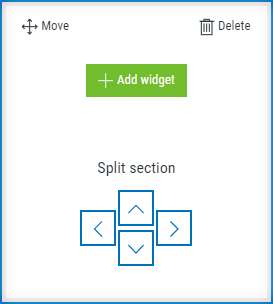
- Move. Click Move in a Widget Frame, then Switch in the Frame you would like to move it to. The Widgets change places.
- Delete. Click Delete to delete the Widget.
- Add Widget. Click Add Widget to open the New Widget pane, where you can define a new Widget to be added to the Dashboard.
- Split section. Click an arrow to split the Widget Frame in the direction of the arrow. The Dashboard allows up to 64 subdivisions.